Dithering in Photoshop
I recently released a set of Dither Brushes for Photoshop (CS5 and probably higher). However it is frowned upon in the pixel art community to use tools when making pixel art, since the community finds a challenge in placing every pixel seperately and purposely. They make the perfect drawing within a grid and often with a limited color set. So why did I still develop a tool and make this set publicly available, and what are my recommendations for using it? To be answer this I will answer the following first:
- What is Dithering?
- How does dithering work with the brushes?
- What kind of problems will I encounter with this tool?
What is Dithering?
Dithering is a technique used to make gradients and different teints of similar colors in pixel art, without using a wide scala of actual colors. It uses a pattern of alternating colors to “mix” two (but rarely more than two) colors together, tricking the human eye into believing that they actually perceive a third color. There are different patterns that can be used, each with a different “density” and style. A similar technique has been used in some pop art that utilised Ben Day dots. And in fact this technique is still used in modern printing; CMYK uses halftone dot patterns and LCD screens; each pixel is created from a red, green and blue subpixel. Tricking the human eye is always great.
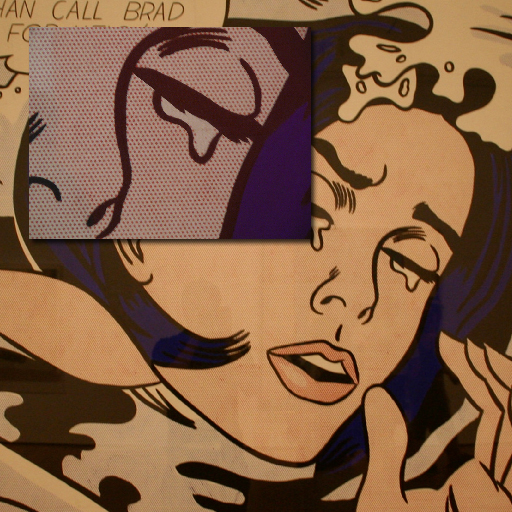
Picture: Tim Pendemon, Close up: Matt Grommes
Often two similar colors are used to create a color that is in between the two, but sometimes a grey is used to desaturate and brighten/darken a color or red and yellow are mixed to make an orange. First color A than a mix of A and B until only color B remains. Such gradients can be very large but often it is only an area of a few pixels. This technique is widely used in shading art, but in more limited color sets (for older hardware) entire art pieces can consist of dithered areas.
Nowadays the main reason for using it is for aestatic reasons. A nice talk on this kind of graphics, including dithering, is by Mark Ferrari, who worked on a lot of 80’s classics like The Secret of Monkey Island. And no, he doesn’t understand why there are still people that want to make pixel art. But he does acknowledge the fact that such limitations make you very creative.
Character by Cure
How does dithering work with the brushes?
So now that we have a little insight in what dithering is lets talk about how the tool works.
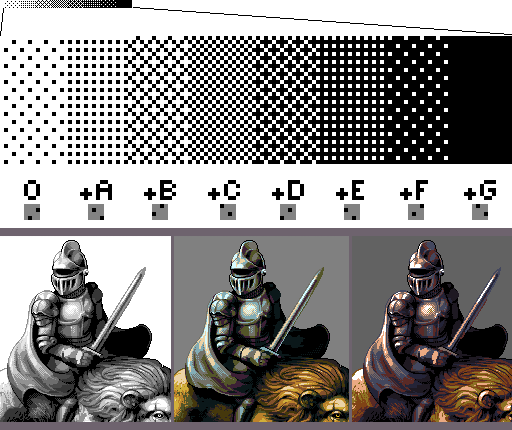
First I made 8 different 4 by 4 pixel patterns, of 2 colored pixels each, making it a pattern of 2/(4*4)=0.125 density. Each of the patterns was designed exactly to make it possible to combine them to make more dense patterns out of it. I named these patterns O, and A through G.
I used these patterns as textures applied to Photoshop Brushes using multiply mode.
Took some thinking time, but in the end it was pretty easy. Even making a pressure sensitive version of the brush was simply using different greys to set the right threshold. The touch sensite version uses the pressure to enable O when it only barely touches, adds A when a bit more pressure is applied, until we finally try to put scratches on the tablet with the pen and G is added to make a fully filled “pattern”. In its current implementation this is done linearly, so based on your input settings the checkboard pattern will be what is put out when regular pressure is applied.
What kind of problems will I encounter with this tool?
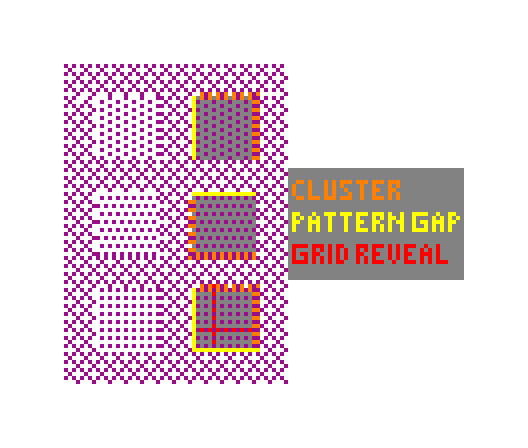
First of all the pattern found for 0.250 density is not perfect, although it is a widely used pattern, it does “reveal the grid” (has a very recognizable pattern). Therefore I introduced two seperate patterns that can be used instead. However each of these patterns do not line up either vertically or horizontally, placing two pixels of the same color directly next to eachother, breaking the smoothness of the gradient.
It should also be noted that there is only one pattern, while the pattern can be shifted both up and down 3 more times effectively leaving 15 patterns behind that can not be used in the current set. These patterns can be recreated using the O, A… G brushes in a different order. If you are OK with using blending modes, you can also uset the pattern stamp tool, with aligned turned of to apply the dithering with other configurations.
Finally you should really know what you are doing and have some feeling on what the dither will look like when zoomed out.
Recommendations
Experiment! That’s the best way of knowing what you can do with these brushes. But I will give you some general advice.
- Don’t use the brushes right away, only use them if you need to dither large areas. That way you will keep some precision.
- Decide which color will be drawn as background and which color you will use in your foreground and keep to that for your entire object. If you don’t you might get into situations where you are drawing the same color as both foreground and background, removing the dither effect.
- If your object’s grid doesn’t line up with an object behind it consider moving the pattern you drew a few pixels, or fix it with a regular brush. This will take some work, but make sure your object doesn’t blend together with whatever is behind it.
- Zoom out often to see if you are not doing something that takes a lot of time to fix.
- While idealistic, I would love to see more HD pixel art, and to make such a thing feasable I think we need tools like that.
To help you out I disabled spacing, to force users to use the brush in a calm fashion, in hopes force people to use it more presicely.
Even with all the downsides that follow from what is considered “good” pixel art, I still think this brush can be really helpful. I personally like them, and I feel that when you keep the limitations in mind it will help you make good pixel art quicker.
In the end you should always retouch your dithers with a nice 1 pixel pencil to make everything look perfect. That is, if you are not a a Game Jam schedule.
Alternatives
If you have a 15 bucks to spare you could also go and buy aseprite, which includes similar tools for dithering, and a whole lot of other features. However, personally I don’t like the flow of using it. (I will try it again in the near future) I do like PyxelEdit though, mainly because it was designed to feel like Photoshop (but has better backup support in case it crashes). I use it to create the outline and initial colors, then I do some dithering (mainly shading), anti-aliasing and sometimes selective outlining (I only use selout if I go for a cartoony look, and need to increase the contrast between background and foreground - nope, I’m not a fan.) in Photoshop and then back to PyxelEdit for sprite sheets and animations. If you are unsure about any terms, I like this pixel art tutorial a lot.